This article walks, step by step, through installing everything you need to compile, run and test a Game Boy ROM on a recent Mac. The target is deliberately minimal: the RGBDS assembler, the GBDK-2020 C compiler, and the SameBoy emulator (both interactive and headless mode for automated tests).
Everything else — tile editor, audio tracker, Git hooks — can be added later. The goal here is to reach the first Hello World on screen as fast as possible.
Procedure validated on macOS Ventura+ (Apple Silicon). A final section gives the Ubuntu / Pop_OS equivalents.
Prerequisites
A terminal, Homebrew and the GitHub CLI.
# Apple command line tools (compiler, git, make)
xcode-select --install

# Homebrew, if missing
/bin/bash -c "$(curl -fsSL https://raw.githubusercontent.com/Homebrew/install/HEAD/install.sh)"

# GitHub CLI (release downloads)
brew install gh
gh auth login
Sanity check:
brew --version
clang --version
gh --version
1. RGBDS — the reference assembler
RGBDS bundles the assembler (rgbasm), the linker (rgblink), the header fixer (rgbfix) and the PNG → tiles converter (rgbgfx). It is mandatory even if you plan to write in C: GBDK-2020 delegates the final link and rgbfix step to RGBDS.
brew install rgbds
Sanity check:
rgbasm --version    # rgbds 0.7+
rgblink --version
rgbfix --version
rgbgfx --version
2. GBDK-2020 — the C compiler
No official Homebrew formula; we grab the latest release from GitHub.
mkdir -p "$HOME/gbdk-dl" && cd "$HOME/gbdk-dl"
gh release download --repo gbdk-2020/gbdk-2020 --pattern 'gbdk-macos-arm64.tar.gz'
tar xzf gbdk-macos-arm64.tar.gz -C "$HOME"   # creates ~/gbdk/
On Intel Macs, replace
gbdk-macos-arm64.tar.gzwithgbdk-macos.tar.gz.
Add to your shell (~/.zshrc):
export GBDK_HOME="$HOME/gbdk"
export PATH="$GBDK_HOME/bin:$PATH"
Reload, then verify:
source ~/.zshrc
lcc -v          # should list sdcc + GBDK
which lcc       # ~/gbdk/bin/lcc
Gatekeeper gotcha: GBDK binaries are not notarised. On first launch macOS may block lcc or sdcc with an “unable to verify the developer” message. Lift quarantine in one shot:
xattr -dr com.apple.quarantine "$HOME/gbdk"
3. SameBoy — accurate, scriptable emulator
Interactive mode via the Homebrew cask:
brew install --cask sameboy
The app installs into /Applications/SameBoy.app. That’s enough to open a ROM by hand, read the debugger, test inputs.
For automated tests you need the sameboy_tester binary (shipped in the sources, not in the cask). On the gb_pipeline side we wrap the build:
cd ~/dev/retro/gb_pipeline
bin/gb install tester
The script clones LIJI32/SameBoy at a pinned tag, builds the tester target, and installs sameboy_tester plus the boot ROMs into ~/bin. To follow another reference:
SAMEBOY_REF=master bin/gb install tester
SAMEBOY_REF=v1.0.4 bin/gb install tester
Sanity check:
sameboy_tester --help
4. Global verification
The pipeline’s Thor CLI (bin/gb doctor) audits the toolchain in a single command:
cd ~/dev/retro/gb_pipeline
bundle install              # one-off
bin/gb doctor
Expected output, every line in ✅:
✅ rgbasm               rgbasm v1.0.1
✅ rgblink              rgblink v1.0.1
✅ rgbfix               rgbfix v1.0.1
✅ rgbgfx               rgbgfx v1.0.1
✅ lcc (GBDK-2020)      /Users/.../gbdk/bin/lcc
✅ sameboy_tester       (installed)
✅ aseprite             …
✅ uge2source           …
✅ clang                Apple clang version 14.0.3
✅ bundle               Bundler version 2.6.2
✅ lefthook             1.13.6
Toolchain complete.
5. First Hello World
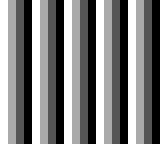
With the toolchain in place, build the pure RGBDS ROM and capture the first frame headlessly:
bin/gb build asm
bin/gb headless hello
open build/hello.bmp
Result: four vertical stripes in four DMG shades — proof that the LCD is initialised and tile 0 is drawn correctly.
And the C equivalent with GBDK:
bin/gb build c
bin/gb headless hello_c
open build/hello_c.bmp
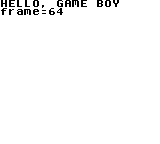
As a bonus, here is the reference frame captured at 3 seconds by the headless test — the exact image used as the comparison baseline by the test suite:

6. (Optional) Aseprite, hUGETracker, flashcart
Out of scope for this article. See docs/install_mac.md §5–§8 in the pipeline for Aseprite (the ~/bin/aseprite wrapper), hUGETracker (uge2source), and EverDrive / EZ-Flash flashcarts.
Appendix — Ubuntu / Pop_OS
On Debian/Ubuntu 22.04 and derivatives (Pop_OS 22.04+), the rgbds package exists but is often one version behind. Prefer the official PPA or the GitHub release to stay aligned with the gbdev community standard.
# Base tooling
sudo apt update
sudo apt install -y build-essential git curl

# RGBDS — apt version (may lag)
sudo apt install -y rgbds
rgbasm --version

# Alternative: build from source (always current)
sudo apt install -y bison libpng-dev pkg-config
git clone https://github.com/gbdev/rgbds.git && cd rgbds
make -j"$(nproc)" && sudo make install
GBDK-2020 (Linux x86_64 release):
mkdir -p ~/gbdk-dl && cd ~/gbdk-dl
gh release download --repo gbdk-2020/gbdk-2020 --pattern 'gbdk-linux64.tar.gz'
tar xzf gbdk-linux64.tar.gz -C "$HOME"
echo 'export GBDK_HOME="$HOME/gbdk"' >> ~/.bashrc
echo 'export PATH="$GBDK_HOME/bin:$PATH"' >> ~/.bashrc
source ~/.bashrc
lcc -v
SameBoy: no official Linux package; build from source.
sudo apt install -y libsdl2-dev rgbds
git clone https://github.com/LIJI32/SameBoy.git && cd SameBoy
make sdl tester -j"$(nproc)"
sudo cp build/bin/SDL/sameboy ~/bin/
sudo cp build/bin/tester/sameboy_tester ~/bin/
The rest (gh, Ruby + Bundler, hooks) follows standard Ubuntu packages and adds nothing Game Boy-specific.
Conclusion
In about half an hour of actual work you end up with a complete environment: assembler, C compiler, visual emulator and headless emulator for automated tests. The stack is identical to what the contemporary gbdev community uses, which makes external tutorials easy to read and external assets (.uge music, PNG tilesets) easy to consume.
Logical next step: a first .asm that lays down the Nintendo header and initialises the LCD. That’s the topic of the next article.
Pipeline repository (currently being opened up): https://github.com/levaleureux/gb_pipeline.